
The Simple Guide to Testing within your Serverless CI/CD Pipelines

Update June 2022: In this article I use AWS CodePipeline for doing Continuous Deployment but I’ve since changed to using GitHub Actions for both CI and CD. Nevertheless, the testing concepts I discuss in this article and how they fit into the different stages of the pipelines are still very relevant no matter what CI/CD service you use.
Designing a testing strategy and a CI/CD pipeline for your serverless application go hand-in-hand. You can’t do one without the other. And if you don’t have a dedicated DevOps expert in your team, it can be hard to know what your pipeline should look like.
You’ll need to answer questions such as:
- What environments do I need?
- What types of tests/checks do I need to run?
-
For each type of test:
- What purpose does it serve? What type of failures is this meant to detect?
- What are its dependencies/pre-requisites to running? (e.g. code libraries, config settings, deployed resources, third-party APIs)
- When should it run and against which environment?
In this article, I’ll help you answer these questions by walking through two relatively straightforward CI/CD workflows that I’ve used with my clients. For each workflow, we’ll look at the different types of tests or checks that run at different stages.
Workflows overview
Here are the two workflows I use, along with associated triggers:
- Pull Request Workflow — A new pull request (PR) is created, or an existing PR branch has new commits pushed to it
- Mainline Workflow — A PR is merged to the main branch (or a commit is pushed directly to the main branch, if your settings allow this)
Let’s look at each workflow in turn.
Pull Request Workflow (CI only)
This simple workflow is triggered whenever a developer creates or updates a PR in GitHub.
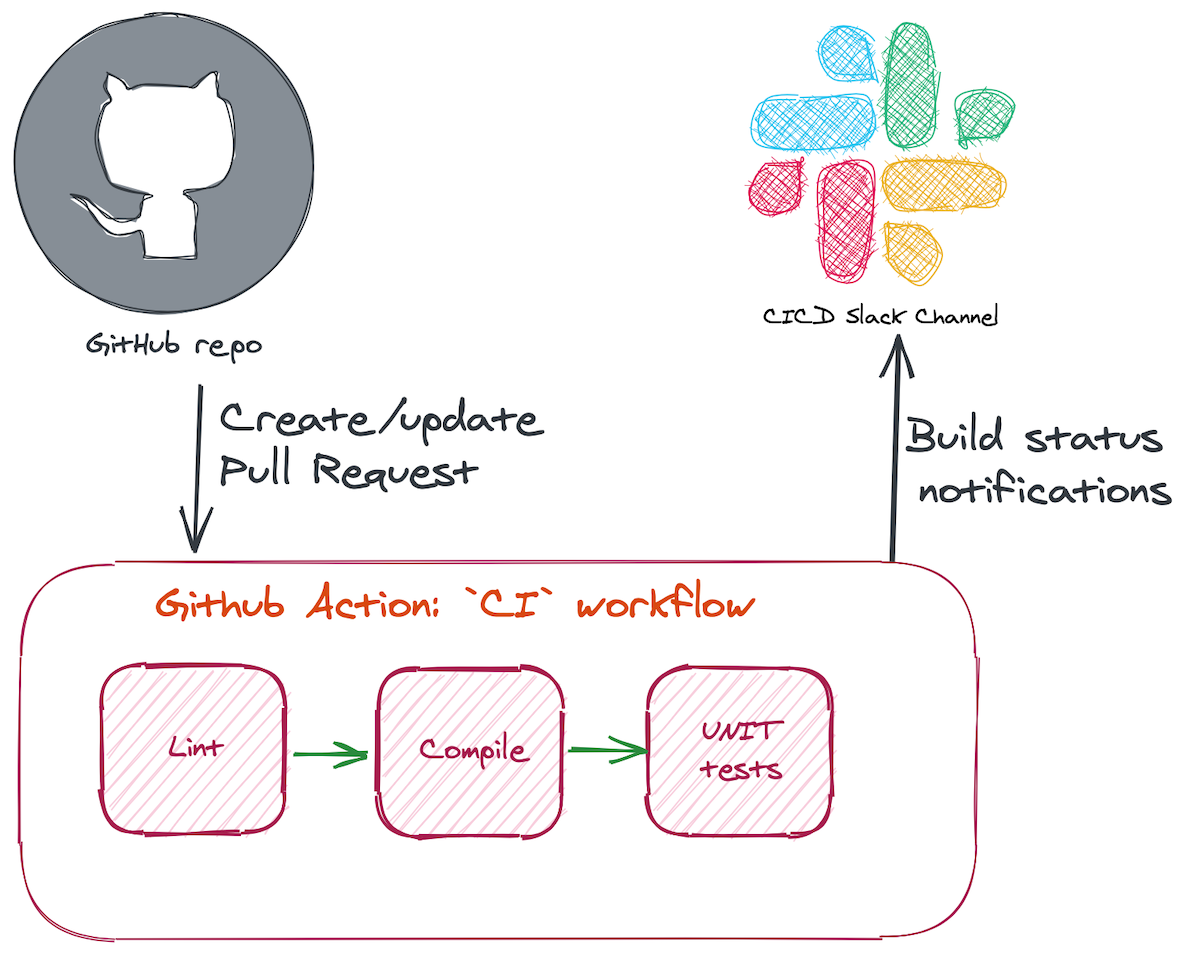
The goal of this workflow is to check the quality of the code changes a developer wishes to merge before any human code review is performed, and feedback any violations to the developer as quickly and precisely as possible.
Aside: The steps I run here are CI only with no CD. This decision is a trade-off on the complexity involved in setting up dynamic ephemeral AWS environments for each Pull Request as opposed to the long-living environments of test, staging and prod. That said, you may very well find that it’s worth investing this effort for your team in order to bring forward the feedback on failing integration/E2E tests to pre-merge.
Here’s what gets run within this workflow:
npm ci— A variation ofnpm installthat performs a clean install ofnode_modulesspecified in the package-lock.json file-
Static analysis
- ESLint — Ensure the code matches agreed-upon standards to ensure consistency across the team (others have bikeshed so you don’t have to!)
- Run TypeScript
tscto check types
- Run unit tests using Jest. Unit tests here must run totally in memory (or filesystem) and not have any dependency on deployed resources or third-party APIs (which would make them integration/E2E tests, which we’ll cover later).
I have recently started using GitHub Actions to run this workflow:
- It’s really quick to configure and get working if you’re already using GitHub to host your code.
- It delivers extremely fast feedback to developers directly within the GitHub UI where they created their PR (checks usually complete in under 30 seconds).
- Code reviewers can see that the automated checks have passed right within GitHub and don’t need to check another CI system before starting their review.
- Given that I’m only running unit tests here, I don’t need to worry about connecting my workflow to AWS accounts or other third party services.
Here’s the code for configuring the workflow:
# ./.github/workflows/ci.yml
name: CI

# Triggers the workflow on new/updated pull requests
on:
  pull_request:

jobs:
  test:
    runs-on: ubuntu-latest

    strategy:
      matrix:
        node-version: [14.x] # set this to configured AWS Lambda Node.js runtime

    steps:
    - uses: actions/checkout@v2
    - name: Use Node.js ${{ matrix.node-version }}
      uses: actions/setup-node@v1
      with:
        node-version: ${{ matrix.node-version }}
    - name: Cache dependencies
      id: cache
      uses: actions/cache@v2
      with:
        path: ./node_modules
        key: modules-${{ hashFiles('package-lock.json') }}
    - name: Install dependencies
      if: steps.cache.outputs.cache-hit != 'true' # only install if package-lock has changed
      run: npm ci --ignore-scripts
    - run: npm run lint
	- run: npm run compile
    - run: npm test
(Check out this article for details on the technique I used here to cache the NPM install node_modules between executions, which was the single slowest step in my workflow, often 20–30 seconds).
Mainline Workflow (CI + CD)
The mainline workflow is responsible for getting a developer’s change (which has passed automated CI and human code review checks) through further stages and eventually into production.
To implement this, I use AWS CodePipeline for orchestrating the flow and AWS CodeBuild for running the deployment and test tasks. Since these services are already tightly integrated into the AWS ecosystem, there is less effort and security risk in performing the deployment (e.g. I don’t need to give an external service access to my production AWS account).
Here’s what my flow looks like:
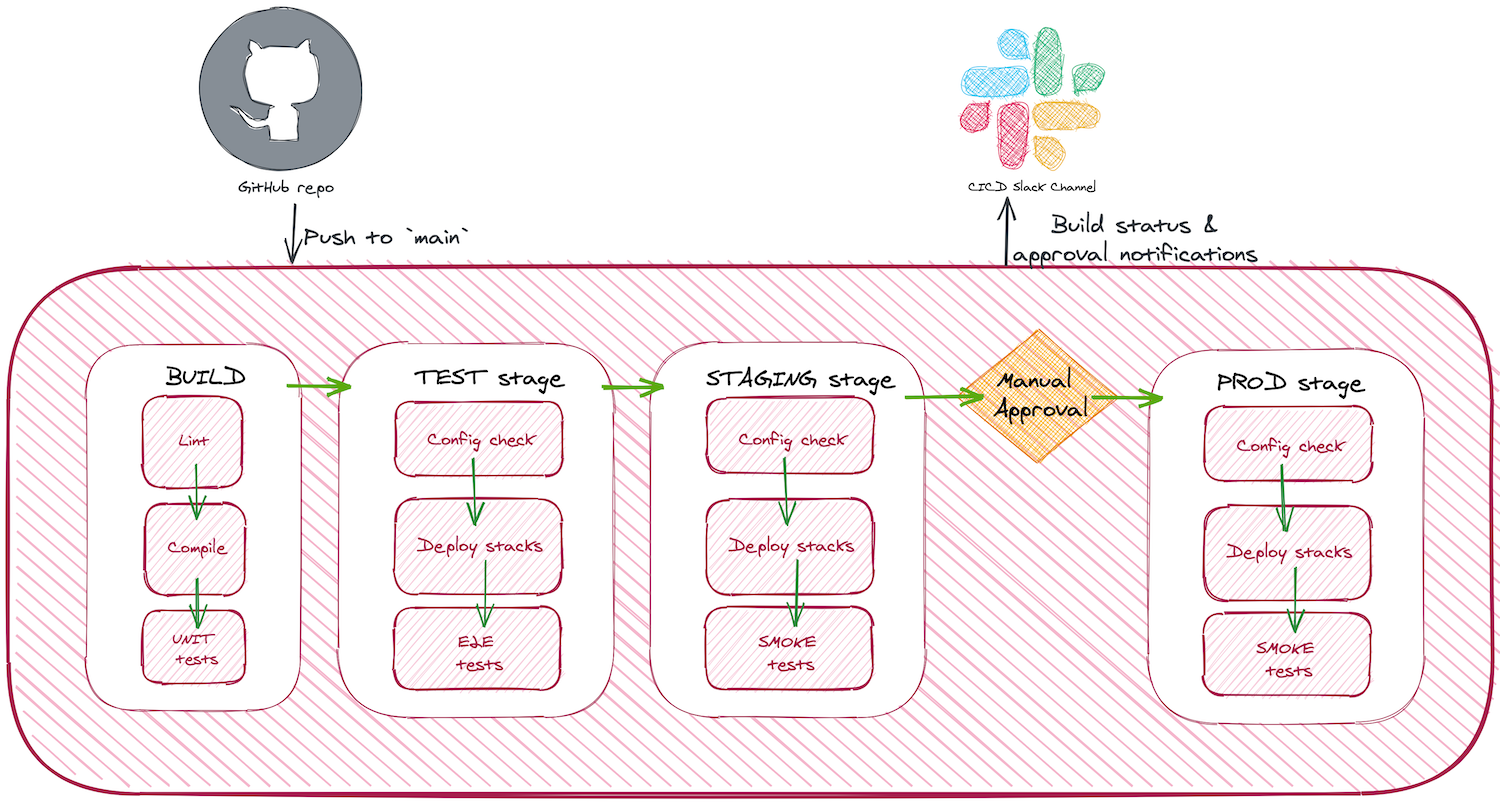
You’ll notice that there are 3 stages: test, staging and prod. I typically deploy each of these stages to their own AWS account. While this isn’t a must-have for the pre-production environments, the account boundary provides the best isolation between environments so you can be more confident that deployments and tests run in each environment don’t interfere with each other. And you should always isolate prod in its own AWS account.
There are a few assumptions my pipeline is making here that you should be aware of:
- The dev team is following a release-from-mainline trunk-based development Git branching model. If this isn’t the case for your team, most of what I’m recommending here could be adapted for a branch-for-release model.
- The app is being deployed monolithically from a monorepo, i.e. all resources within the system are deployed at the same time. I find monolithic deployments are the easiest to manage within the client teams and products I work with. If your system has multiple microservices AND you wish to deploy these independently based on what code changed, then you’ll need multiple pipelines which will be significantly more complex than what I’m proposing here (check out Four Theorem’s SLIC Starter for a great example of CI/CD pipeline for independently deployed serverless microservices).
In the next sections, I’ll walk through each stage in more detail.
Build stage
The build stage repeats the static analysis and unit test tasks performed in the GitHub Actions Pull Request Workflow. This is to double check that the merge hasn’t introduced any issues.
You might be surprised to notice that there is no packaging step here. The reason for this is because unfortunately Serverless Framework (which I use to define and deploy the infrastructure resources) doesn’t support building an environment-independent deployment artifact which can then flow through each stage in the pipeline. This means that the “Deploy stacks” task that you see in the later stages creates an environment-specific package which it deploys to the target account. (General consensus among experienced serverless devs is that this limitation isn’t anything to worry about).
Test stage
The purpose of the test stage is to provide an isolated environment that only this CI/CD pipeline has access to for automated E2E testing. No human testers or other systems have access to this environment.
The first step at this stage is a configuration test. While the vast majority of the configuration will be contained in the version-controlled source code (because every resource is defined in Infrastructure-as-Code), the one thing that’s not in Git is secrets. Secrets such as passwords, API keys, etc, that are required by Lambda functions should be stored in SSM Parameter Store (or Secrets Manager) and fetched at runtime. However, the deployment of the values for these secrets needs to be performed by a human engineer ahead of time, and this is something which they could forget to do! This check uses a secrets.sample.env file stored in the Git repo and checks that each key defined in it has an associated parameter set within SSM Parameter Store for the target environment. If this check fails, deployment does not proceed.
After the config check comes the deployment itself, using the sls deploy command. I usually have 2 stacks to deploy (an infra stack containing stateful resources such as DynamoDB tables and S3 buckets and an api stack containing APIGW or AppSync endpoints along with Lambda functions), which are deployed in series.
Once the deployment completes, the E2E tests are run using Jest. Before running these tests, the serverless-export-env plugin is used to generate a .env file with all the URLs, etc from the deployment so that the tests know which endpoints to hit.
Staging stage
The purpose of the staging stage is to act as an environment where human testers can perform manual testing before releasing changes to production. If you’re building an API and you have separate front-end (web or mobile) teams, they can point their pre-production apps at this environment as it will be relatively stable, since code that gets this far has passed full E2E testing in the test stage.
We still do need to run a few tests at this stage though. Before deployment, we need to again perform a config check to ensure that secrets have been deployed correctly.
Post-deployment, we run a set of smoke tests. The main purpose of these smoke tests is to ensure that the system is available and that environment-specific configuration is correct.
For example, if a Lambda function talks to a third party API, we could write a smoke test that invokes the function and verifies that it communicates correctly with this service. This would verify that the API URL and API keys we’re using are correct.
An important aspect of smoke tests (which differentiates them from E2E tests) is that they should have minimal side effects. Ideally they would be fully readonly but at the very least they should not introduce any test data into the system which could become visible to human users.
Manual approval
Once the staging deployment and tests complete, a notification is sent to the team to manually approve. This is an opportunity to perform any manual testing before proceeding to production.
Once satisfied with the system, you can use the CodePipeline console to give approval and the pipeline will move onto the prod stage.
Production stage
The prod stage is the live environment that your users will access. The steps at this stage are the same as those in the staging stage.
Summary of test types
So now we’ve reach the end of the pipeline, let’s summarise the different types of tests we’ve used and where they were employed:
| Test | Description | When to run |
|---|---|---|
| Static analysis | Lint and compile (tsc) |
At start of PR and mainline pipelines |
| Unit | Verifies complex business logic. Has no out-of-process runtime dependencies | After static analysis at start of PR and mainline pipelines |
| Config | Verifies presence of non-version controlled configuration (e.g. secrets) | Pre-deployment, in test, staging and prod stages |
| E2E | Verifies behaviour of deployed system, e.g. by invoking API endpoints, deployed Lambda functions, etc | Post-deployment, in test stage |
| Smoke | Verifies system availability and correctness of environment-specific config | Post-deployment, in staging and prod stages |
Building out your own pipeline
This may seem like a lot of checks to create your own pipeline and maybe you don’t have the time to build all this upfront. But don’t let this put you off as having ANY tests running in a CI/CD pipeline is better than none. I’ve seen many teams that do no CI/CD at all and just deploy directly from developer workstations (and I’m not the only one!).
To get you started, the Pull Request Workflow is much easier to configure as it has less moving parts. The limitation is that you can only do CI and not CD.
Once you move on to the mainline CI+CD pipeline, consider adding each type of test incrementally to your pipeline. Here’s my recommended order for building out each one:
- Static analysis — Start with these as they’re quick to run, catch a lot of silly mistakes early in the cycle, and are easy to implement as they just have a single config file at the repo-level.
- E2E tests — These are the biggest confidence drivers for serverless apps, so once these run successfully you can have much greater assurance doing Continuous Delivery
- Unit tests — Unit tests are usually fast to run and a good fit for testing complex business logic inside a Lambda function. I’ve ranked them behind E2E tests as I generally find my use cases don’t require many of them.
- Smoke tests — If you’re doing manual testing, these are probably lower priority. If you have effective alerting set up in production, you’ll soon know you have issues anyway!
- Config tests — These checks would be lowest priority as your E2E or smoke tests should capture any missing/bad configuration. The major benefit config tests bring is not increased confidence but instead a faster failure since they can be run before the (usually slow) deployment step.
If you’re interested in getting hands-on practice in creating the types of tests discussed in this article, check out my 4-week Serverless Testing Workshop. The workshop is a mixture of self-paced video lessons alongside weekly live group sessions where you will join me and other engineers to discuss and work through different testing scenarios.
Other articles you might enjoy:
Free Email Course
How to transition your team to a serverless-first mindset
In this 5-day email course, you’ll learn:
- Lesson 1: Why serverless is inevitable
- Lesson 2: How to identify a candidate project for your first serverless application
- Lesson 3: How to compose the building blocks that AWS provides
- Lesson 4: Common mistakes to avoid when building your first serverless application
- Lesson 5: How to break ground on your first serverless project