How to build a serverless photo upload service with API Gateway

So you’re building a REST API and you need to add support for uploading files from a web or mobile app. You also need to add a reference to these uploaded files against entities in your database, along with metadata supplied by the client.
In this article, I’ll show you how to do this using AWS API Gateway, Lambda and S3. We’ll use the example of an event management web app where attendees can login and upload photos associated with a specific event along with a title and description. We will use S3 to store the photos and an API Gateway API to handle the upload request. The requirements are:
- User can login to the app and view a list of photos for a specific event, along with each photo’s metadata (date, title, description, etc).
- User can only upload photos for the event if they are registered as having attended that event.
- Use Infrastructure-as-Code for all cloud resources to make it easy to roll this out to multiple environments. (No using the AWS Console for mutable operations here 🚫🤠)
Considering implementation options
Having built similar functionality in the past using non-serverless technologies (e.g. in Express.js), my initial approach was to investigate how to use a Lambda-backed API Gateway endpoint that would handle everything: authentication, authorization, file upload and finally writing the S3 location and metadata to the database. While this approach is valid and achievable, it does have a few limitations:
- You need to write code inside your Lambda to manage the multipart file upload and the edge cases around this, whereas the existing S3 SDKs are already optimized for this.
- Lambda pricing is duration-based so for larger files your function will take longer to complete, costing you more.
- API Gateway has a payload size hard limit of 10MB. Contrast that to the S3 file size limit of 5GB.
Using S3 presigned URLs for upload
After further research, I found a better solution involving uploading objects to S3 using presigned URLs as a means of both providing a pre-upload authorization check and also pre-tagging the uploaded photo with structured metadata.
The diagram below shows the request flow from a web app.
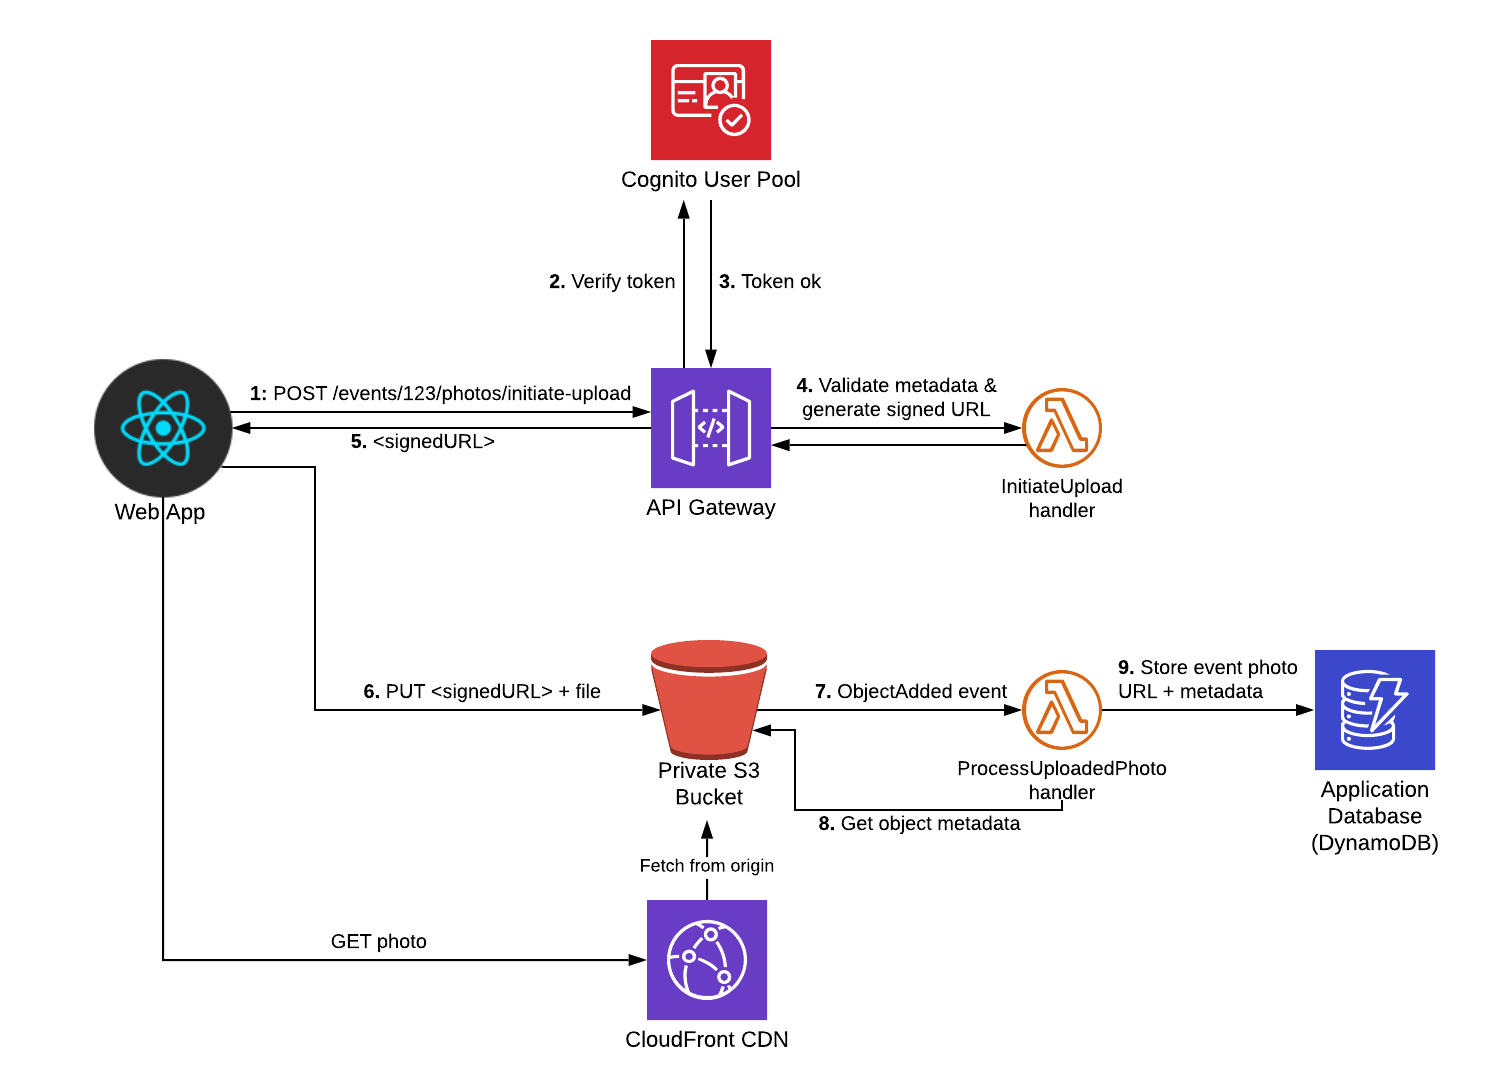
The main thing to notice is that from the web client’s point of view, it’s a 2-step process:
- Initiate the upload request, sending metadata related to the photo (e.g. eventId, title, description, etc). The API then does an auth check, executes business logic (e.g. restricting access only to users who have attended the event) and finally generates and responds with a secure presigned URL.
- Upload the file itself using the presigned URL.
I’m using Cognito as my user store here but you could easily swap this out for a custom Lambda Authorizer if your API uses a different auth mechanism.
Let’s dive in…
Step 1: Create the S3 bucket
I use the Serverless Framework to manage configuration and deployment of all my cloud resources. For this app, I use 2 separate “services” (or stacks), that can be independently deployed:
infraservice: this contains the S3 bucket, CloudFront distribution, DynamoDB table and Cognito User Pool resources.photos-apiservice: this contains the API Gateway and Lambda functions.
You can view the full configuration of each stack in the Github repo, but we’ll cover the key points below.
The S3 bucket is defined as follows:
resources:
  Resources:
    PhotosBucket:
        Type: AWS::S3::Bucket
        Properties:
            BucketName: !Sub ‘${self:custom.photosBucketName}’
            AccessControl: Private
            CorsConfiguration:
                CorsRules:
                -   AllowedHeaders: [‘*’]
                    AllowedMethods: [‘PUT’]
                    AllowedOrigins: [‘*’]
The CORS configuration is important here as without it your web client won’t be able to perform the PUT request after acquiring the signed URL.
I’m also using CloudFront as the CDN in order to minimize latency for users downloading the photos. You can view the config for the CloudFront distribution here. However, this is an optional component and if you’d rather clients read photos directly from S3 then you can change the AccessControl property above to be PublicRead.
Step 2: Create “Initiate Upload” API Gateway endpoint
Our next step is to add a new API path that the client endpoint can call to request the signed URL. Requests to this will look like so:
POST /events/{eventId}/photos/initiate-upload
{
    "title": "Keynote Speech",
    "description": "Steve walking out on stage",
    "contentType": "image/png"
}
Responses will contain an object with a single s3PutObjectUrl field that the client can use to upload to S3. This URL looks like so:
https://s3.eu-west-1.amazonaws.com/eventsapp-photos-dev.sampleapps.winterwindsoftware.com/uploads/event_1234/1d80868b-b05b-4ac7-ae52-bdb2dfb9b637.png?AWSAccessKeyId=XXXXXXXXXXXXXXX&Cache-Control=max-age%3D31557600&Content-Type=image%2Fpng&Expires=1571396945&Signature=F5eRZQOgJyxSdsAS9ukeMoFGPEA%3D&x-amz-meta-contenttype=image%2Fpng&x-amz-meta-description=Steve%20walking%20out%20on%20stage&x-amz-meta-eventid=1234&x-amz-meta-photoid=1d80868b-b05b-4ac7-ae52-bdb2dfb9b637&x-amz-meta-title=Keynote%20Speech&x-amz-security-token=XXXXXXXXXX
Notice in particular these fields embedded in the query string:
x-amz-meta-XXX— These fields contain the metadata values that ourinitiateUploadLambda function will set.x-amz-security-token— this contains the temporary security token used for authenticating with S3Signature— this ensures that the PUT request cannot be altered by the client (e.g. by changing metadata values)
The following extract from serverless.yml shows the function configuration:
# serverless.yml
service: eventsapp-photos-api
…
custom:
    appName: eventsapp
    infraStack: ${self:custom.appName}-infra-${self:provider.stage}
    awsAccountId: ${cf:${self:custom.infraStack}.AWSAccountId}
    apiAuthorizer:
        arn: arn:aws:cognito-idp:${self:provider.region}:${self:custom.awsAccountId}:userpool/${cf:${self:custom.infraStack}.UserPoolId}
    corsConfig: true

functions:
…
	httpInitiateUpload:
        handler: src/http/initiate-upload.handler
        iamRoleStatements:
        -   Effect: Allow
            Action:
                - s3:PutObject
            Resource: arn:aws:s3:::${cf:${self:custom.infraStack}.PhotosBucket}*
        events:
        - http:
            path: events/{eventId}/photos/initiate-upload
            method: post
            authorizer: ${self:custom.apiAuthorizer}
            cors: ${self:custom.corsConfig}
A few things to note here:
- The
httpInitiateUploadLambda function will handle POST requests to the specified path. - The Cognito user pool (output from the
infrastack) is referenced in the function’sauthorizerproperty. This makes sure requests without a valid token in theAuthorizationHTTP header are rejected by API Gateway. - CORS is enabled for all API endpoints
- Finally, the
iamRoleStatementsproperty creates an IAM role that this function will run as. This role allowsPutObjectactions against the S3 photos bucket. It is especially important that this permission set follows the least privilege principle as the signed URL returned to the client contains a temporary access token that allows the token holder to assume all the permissions of the IAM role that generated the signed URL.
Now let’s look at the handler code:
import S3 from 'aws-sdk/clients/s3';
import uuid from 'uuid/v4';
import { InitiateEventPhotoUploadResponse, PhotoMetadata } from '@common/schemas/photos-api';
import { isValidImageContentType, getSupportedContentTypes, getFileSuffixForContentType } from '@svc-utils/image-mime-types';
import { s3 as s3Config } from '@svc-config';
import { wrap } from '@common/middleware/apigw';
import { StatusCodeError } from '@common/utils/errors';

const s3 = new S3();

export const handler = wrap(async (event) => {
    // Read metadata from path/body and validate
  const eventId = event.pathParameters!.eventId;
  const body = JSON.parse(event.body || '{}');
  const photoMetadata: PhotoMetadata = {
    contentType: body.contentType,
    title: body.title,
    description: body.description,
  };
  if (!isValidImageContentType(photoMetadata.contentType)) {
    throw new StatusCodeError(400, `Invalid contentType for image. Valid values are: ${getSupportedContentTypes().join(',')}`);
  }
  // TODO: Add any further business logic validation here (e.g. that current user has write access to eventId)

  // Create the PutObjectRequest that will be embedded in the signed URL
  const photoId = uuid();
  const req: S3.Types.PutObjectRequest = {
    Bucket: s3Config.photosBucket,
    Key: `uploads/event_${eventId}/${photoId}.${getFileSuffixForContentType(photoMetadata.contentType)!}` ,
    ContentType: photoMetadata.contentType,
    CacheControl: 'max-age=31557600',  // instructs CloudFront to cache for 1 year
    // Set Metadata fields to be retrieved post-upload and stored in DynamoDB
    Metadata: {
      ...(photoMetadata as any),
      photoId,
      eventId,
    },
  };
  // Get the signed URL from S3 and return to client
  const s3PutObjectUrl = await s3.getSignedUrlPromise('putObject', req);
  const result: InitiateEventPhotoUploadResponse = {
    photoId,
    s3PutObjectUrl,
  };
  return {
    statusCode: 201,
    body: JSON.stringify(result),
  };
});
The s3.getSignedUrlPromise is the main line of interest here. It serializes a PutObject request into a signed URL.
I’m using a wrap middleware function in order to handle cross-cutting API concerns such as adding CORS headers and uncaught error logging.
Step 3: Uploading file from the web app
Now to implement the client logic. I’ve created a very basic (read: ugly) create-react-app example (code here). I used Amplify’s Auth library to manage the Cognito authentication and then created a PhotoUploader React component which makes use of the React Dropzone library:
// components/Photos/PhotoUploader.tsx
import React, { useCallback } from 'react';
import { useDropzone } from 'react-dropzone';
import { uploadPhoto } from '../../utils/photos-api-client';

const PhotoUploader: React.FC<{ eventId: string }> = ({ eventId }) => {
  const onDrop = useCallback(async (files: File[]) => {
    console.log('starting upload', { files });
    const file = files[0];
    try {
      const uploadResult = await uploadPhoto(eventId, file, {
        // should enhance this to read title and description from text input fields.
        title: 'my title',
        description: 'my description',
        contentType: file.type,
      });
      console.log('upload complete!', uploadResult);
      return uploadResult;
    } catch (error) {
      console.error('Error uploading', error);
      throw error;
    }
  }, [eventId]);
  const { getRootProps, getInputProps, isDragActive } = useDropzone({ onDrop });

  return (
    <div {...getRootProps()}>
      <input {...getInputProps()} />
      {
        isDragActive
          ? <p>Drop the files here ...</p>
          : <p>Drag and drop some files here, or click to select files</p>
      }
    </div>
  );
};

export default PhotoUploader;

// utils/photos-api-client.ts
import { API, Auth } from 'aws-amplify';
import axios, { AxiosResponse } from 'axios';
import config from '../config';
import { PhotoMetadata, InitiateEventPhotoUploadResponse, EventPhoto } from '../../../../services/common/schemas/photos-api';

API.configure(config.amplify.API);

const API_NAME = 'PhotosAPI';

async function getHeaders(): Promise<any> {
  // Set auth token headers to be passed in all API requests
  const headers: any = { };
  const session = await Auth.currentSession();
  if (session) {
    headers.Authorization = `${session.getIdToken().getJwtToken()}`;
  }
  return headers;
}

export async function getPhotos(eventId: string): Promise<EventPhoto[]> {
  return API.get(API_NAME, `/events/${eventId}/photos`, { headers: await getHeaders() });
}

export async function uploadPhoto(
  eventId: string, photoFile: any, metadata: PhotoMetadata,
): Promise<AxiosResponse> {
  const initiateResult: InitiateEventPhotoUploadResponse = await API.post(
    API_NAME, `/events/${eventId}/photos/initiate-upload`, { body: metadata, headers: await getHeaders() },
  );
  return axios.put(initiateResult.s3PutObjectUrl, photoFile, {
    headers: {
      'Content-Type': metadata.contentType,
    },
  });
}
The uploadPhoto function in the photos-api-client.ts file is the key here. It performs the 2-step process we mentioned earlier by first calling our initiate-upload API Gateway endpoint and then making a PUT request to the s3PutObjectUrl it returned. Make sure that you set the Content-Type header in your S3 put request, otherwise it will be rejected as not matching the signature.
Step 4: Pushing photo data into database
Now that the photo has been uploaded, the web app will need a way of listing all photos uploaded for an event (using the getPhotos function above).
To close this loop and make this query possible, we need to record the photo data in our database. We do this by creating a second Lambda function processUploadedPhoto that is triggered whenever a new object is added to our S3 bucket.
Let’s look at its config:
# serverless.yml
service: eventsapp-photos-api
…

functions:
…
    s3ProcessUploadedPhoto:
        handler: src/s3/process-uploaded-photo.handler
        iamRoleStatements:
            -   Effect: Allow
                Action:
                    - dynamodb:Query
                    - dynamodb:Scan
                    - dynamodb:GetItem
                    - dynamodb:PutItem
                    - dynamodb:UpdateItem
                Resource: arn:aws:dynamodb:${self:provider.region}:${self:custom.awsAccountId}:table/${cf:${self:custom.infraStack}.DynamoDBTablePrefix}*
            -   Effect: Allow
                Action:
                    - s3:GetObject
                    - s3:HeadObject
                Resource: arn:aws:s3:::${cf:${self:custom.infraStack}.PhotosBucket}*
        events:
            - s3:
                bucket: ${cf:${self:custom.infraStack}.PhotosBucket}
                event: s3:ObjectCreated:*
                rules:
                    - prefix: uploads/
                existing: true
It’s triggered off the s3:ObjectCreated event and will only fire for files added beneath the uploads/ top-level folder.
In the iamRoleStatements section, we are allowing the function to write to our DynamoDB table and read from the S3 Bucket.
Now let’s look at the function code:
import { S3Event } from 'aws-lambda';
import S3 from 'aws-sdk/clients/s3';
import log from '@common/utils/log';
import { EventPhotoCreate } from '@common/schemas/photos-api';
import { cloudfront } from '@svc-config';
import { savePhoto } from '@svc-models/event-photos';

const s3 = new S3();

export const handler = async (event: S3Event): Promise<void> => {
  const s3Record = event.Records[0].s3;

  // First fetch metadata from S3
  const s3Object = await s3.headObject({ Bucket: s3Record.bucket.name, Key: s3Record.object.key }).promise();
  if (!s3Object.Metadata) {
    // Shouldn't get here
    const errorMessage = 'Cannot process photo as no metadata is set for it';
    log.error(errorMessage, { s3Object, event });
    throw new Error(errorMessage);
  }
  // S3 metadata field names are converted to lowercase, so need to map them out carefully
  const photoDetails: EventPhotoCreate = {
    eventId: s3Object.Metadata.eventid,
    description: s3Object.Metadata.description,
    title: s3Object.Metadata.title,
    id: s3Object.Metadata.photoid,
    contentType: s3Object.Metadata.contenttype,
    // Map the S3 bucket key to a CloudFront URL to be stored in the DB
    url: `https://${cloudfront.photosDistributionDomainName}/${s3Record.object.key}`,
  };
  // Now write to DDB
  await savePhoto(photoDetails);
};
The event object passed to the Lambda handler function only contains the bucket name and key of the object that triggered it. So in order to fetch the metadata, we need to use the headObject S3 API call.
Once we’ve extracted the required metadata fields, we then construct a CloudFront URL for the photo (using the CloudFront distribution’s domain name passed in via an environment variable) and save to DynamoDB.
Future enhancements
A potential enhancement that could be made to the upload flow is to add in an image optimization step before saving it to the database. This would involve a having a Lambda function listen for S3:ObjectCreated events beneath the upload/ key prefix which then reads the image file, resizes and optimizes it accordingly and then saves the new copy to the same bucket but under a new optimized/ key prefix. The config of our Lambda function that saves to the database should then be updated to be triggered off this new prefix instead.
Other articles you might enjoy:
Free Email Course
How to transition your team to a serverless-first mindset
In this 5-day email course, you’ll learn:
- Lesson 1: Why serverless is inevitable
- Lesson 2: How to identify a candidate project for your first serverless application
- Lesson 3: How to compose the building blocks that AWS provides
- Lesson 4: Common mistakes to avoid when building your first serverless application
- Lesson 5: How to break ground on your first serverless project