Migrating authentication from Express.js to API Gateway using a Lambda Authorizer

This is part 6 in the series Migrating a Monolithic SaaS App to Serverless — A Decision Journal.
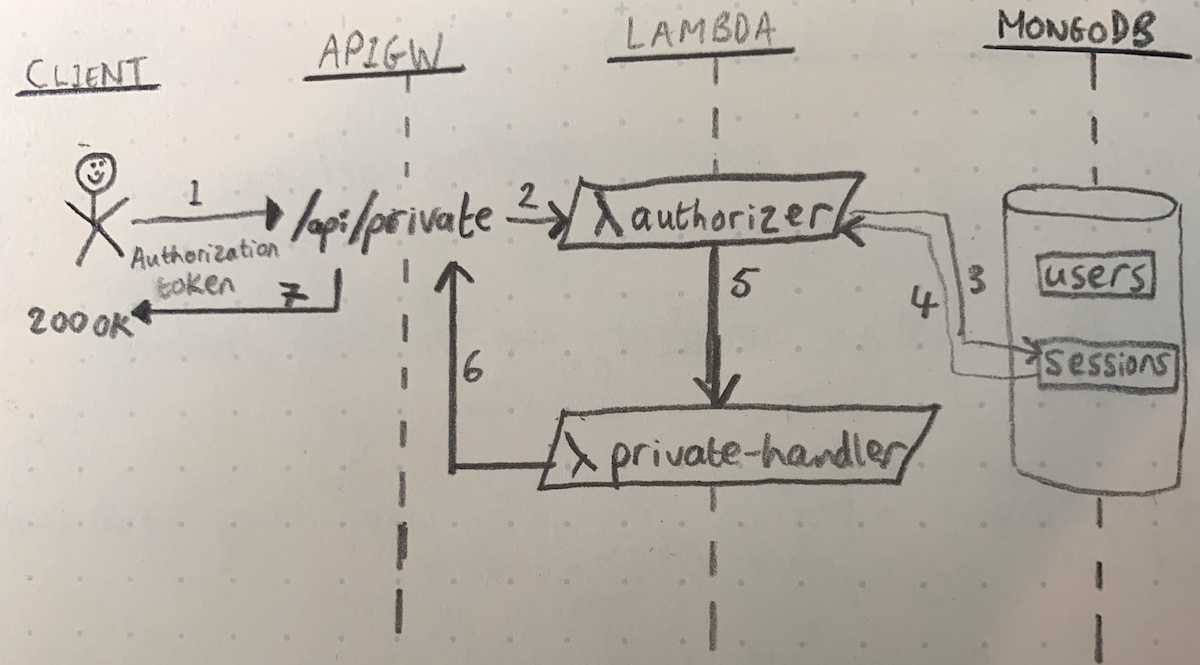
Before I can migrate any of the routes from my Express.js API to API Gateway + Lambda, I first need to implement an authentication and authorization mechanism such that the API Gateway endpoints respect the same auth logic as their legacy API counterparts.
My constraints for this are as follows:
- Keep the same back-end MongoDB user and session store that the legacy app is using as I want to avoid/minimise code changes to the legacy app. This rules out using dedicated auth services such as AWS Cognito or Auth0 which would be my first stops for auth in a greenfield app.
- Clients authenticate to the existing API by first obtaining a session token via a call to a login endpoint and then by providing this token in subsequent requests either in the Cookie or Authorization HTTP headers. This behaviour needs to be reproduced in my API Gateway implementation.
- The login endpoint itself (i.e. how the token is obtained in the first place) is out of scope for this task, and the legacy login endpoint will continue to be used for now.
- This will be an interim solution as my longer-term goal for this migration process is to replace MongoDB as my back-end data store.
Using a Lambda Authorizer to authenticate API requests
API Gateway allows you to define a Lambda Authorizer to execute custom authentication and authorization logic before allowing a client access to the actual API route they have requested. A Lambda Authorizer function is somewhat similar to a middleware in Express.js in that it gets called before the main route handler function, it can reject a request outright, or if it allows the request to proceed, it can enhance the request event with extra data that the main route handler can then reference (e.g. user and role information).
Authentication vs Authorization
Before we dive into the implementation detail, I want to make clear the distinction between these related “auth” concepts as they are often conflated and the AWS naming of “Lambda Authorizer” does not help here:
- Authentication is the process of verifying who you are. When you log on to a computer or app with a username and password you are authenticating.
- Authorization is the process of verifying that you have access to something. Gaining access to a resource because the permissions configured on it allow you access is authorization.
(What is the difference between authentication and authorization? - Server Fault)
If you are implementing a Lambda Authorizer, your function will always need to perform authentication (i.e. ensure you are who you say you are) but it does not necessarily need to perform authorization (i.e. check that you have permissions to access the resource you are requesting).
In my case, I decided (for now) that my Lambda Authorizer would only perform authentication and that the authorization logic will reside in the route handler functions as the necessary permissions vary across different routes. As I start migrating more routes over to Lambda, I may then decide to move common authorization logic to the shared Lambda Authorizer.
For an in-depth look at different strategies for using Lambda Authorizers, check out The Complete Guide to Custom Authorizers with AWS Lambda and API Gateway.
Reverse engineering the Express authentication logic
My legacy API uses the Passport.js and express-session middlewares. I could potentially just import these modules into my Lambda Authorizer function. However, I decided against this for a few reasons:
- These modules were built specifically for use with Express so I would end up having to hack a way of invoking them in a non-standard way from a Lambda.
- I don’t want to add a raft of new dependencies to my Lambda and incur the extra coldstart overhead and increased security threat that this would bring.
So I decided to inspect the code on Github for these modules and extract the necessary logic into my Lambda function. I’ll not share the full implementation code here, but it follows these steps to process a request:
- Fetch token from HTTP request header (either the
Cookieor theAuthorizationheader). - Use session secret to decrypt token and extract SessionID from it.
- Using SessionID, fetch session object from MongoDB and get user data stored inside it.
- Add user data to the request context.
Allowing and denying requests
If a request is successfully authenticated, in order to tell API Gateway it can proceed with invoking the handler for the requested route, the Lambda Authorizer function needs to return a response which contains an IAM policy document that allows the caller invoke access to the handler.
Here’s an example of a response the Lambda Authorizer function returns for an allowed request:
{
    "principalId": "my_user_id",
    "policyDocument": {
        "Version": "2012-10-17",
        "Statement": [
            {
                "Action": "execute-api:Invoke",
                "Effect": "Allow",
                "Resource": "*"
            }
        ]
    },
    "context": {
        "userId": "my_user_id",
        "customerAccountId": "my_customer_account_id",
        "fullName": "John Smith",
        "roles": "[]"
    }
}
Notice here the context object where I provide further information that is stored against the user record in MongoDB. API Gateway makes this context data available to the handler function (which we’ll cover below).
That’s the happy path covered, but there are several reasons why a request could be rejected, e.g.
- No token provided
- Invalid token provided
- Session expired
In each of these cases, I want to send back a HTTP 401 Unauthorized status code to the client, but it wasn’t immediately obvious from reading the AWS docs how I could do this.
In normal API Gateway Lambda handlers, there is a statusCode field in the response that you can set, but Lambda Authorizer responses don’t work that way. The examples show throwing an error (or if you’re using legacy Node, passing an Error in the callback). However, when I tested this, API Gateway returned a 403 error. I couldn’t work out what was going on until I realised that the actual string in the error message needs to match one of API Gateway’s built-in message -> status code mappings. I hadn’t realised this significance and had been using my own custom error strings and API Gateway didn’t know what to do with those so it just defaulted to returning a 403.
import { CustomAuthorizerEvent, AuthResponse } from 'aws-lambda';

/** Built-in error messages that API Gateway auto-maps to HTTP status codes */
export enum APIGatewayErrorMessage {
    /** 401 */
    Unauthorized = 'Unauthorized',
    /** 403 */
    AccessDenied = 'Access Denied',
}

/** Lambda Authorizer handler */
export const handler = async (event: CustomAuthorizerEvent): Promise<AuthResponse> => {
    if (!event.headers) {
        // No token provided
        throw new Error(APIGatewayErrorMessage.Unauthorized);
    }
    // first check Authorization bearer header
    if (event.headers.Authorization) {
        const [key, val] = event.headers.Authorization.split(' ');
        if (key && key.toLowerCase() === 'bearer' && val) {
            return authenticateToken(val);
        }
        // Badly formed header
        throw new Error(APIGatewayErrorMessage.Unauthorized);
    }
    // ... rest of auth logic
};
Wiring up auth logic to a private endpoint
So far I’ve covered the implementation of the Lambda Authorizer but not shown how you connect it to the endpoints that you want to protect. As I don’t yet have a real endpoint in my service, I created a test private-endpoint. This endpoint simply returns the user context data passed onto it from the Lambda Authorizer back to authenticated clients.
Here are the relevant parts of my serverless.yml file:
custom:
    vpcSettings:
      securityGroupIds:
        - !Ref MLabSecurityGroup
      subnetIds:
        - ${cf:vpc.SubnetAPrivate}
        - ${cf:vpc.SubnetBPrivate}
    lambda_authorizer:
        name: authorizer
        resultTtlInSeconds: 0
        identitySource: ''
        type: request

functions:
    # Lambda Authorizer function
    authorizer:
        handler: src/functions/authorizer.handler
        vpc: ${self:custom.vpcSettings}
        environment:
            SESSION_SECRET: ${ssm:/autochart/${self:provider.stage}/session-secret~true}
    private-endpoint:
        handler: src/functions/private-endpoint.handler
        vpc: ${self:custom.vpcSettings}
        events:
        - http:
            path: ${self:custom.apiRoot}/private
            method: get
            authorizer: ${self:custom.lambda_authorizer}
Firstly, you’ll notice that my functions need to be inside a VPC in order to access my MongoDB database. I also pass a SESSION_SECRET environment variable (fetched from SSM Parameter Store) to my authorizer function. This is the same session secret that the legacy API uses to sign session keys.
The http.authorizer attribute of the private-endpoint function is where the connection is made between the endpoint handler and the authorizer function.
The private-endpoint handler function can then access the custom user data via the event.requestContext.authorizer field:
// src/functions/private-endpoint.ts
import { APIGatewayProxyEvent, APIGatewayProxyResult } from 'aws-lambda';

export const handler = wrap(async (event: APIGatewayProxyEvent): Promise<APIGatewayProxyResult> => {
    const response = {
        authContext: event.requestContext.authorizer,
    };
    return {
        statusCode: 200,
        body: JSON.stringify(response),
    };
});
To cache or not to cache
API Gateway allows you to cache the responses of Lambda Authorizers for a period of time. This can be useful as it avoids the extra latency incurred on each request by calling an extra function and the roundtrip to MongoDB to fetch the session data. While this seems like it would be prudent, I decided against implementing this at this stage for a few reasons:
- The existing legacy API currently has no auth caching, so the roundtrip to MongoDB will not add additional latency.
- Caching could introduce strange behaviour and require complex invalidation logic across both new and legacy APIs (e.g. if user logs out).
- I couldn’t work out if my use case of allowing the auth token to be in EITHER the cookie OR the authorization header is supported. API Gateway allows you to specify zero or more “Identity Sources” which stipulate the HTTP request parameters that are required in the auth logic. If this is specified, the parameter is used to form a cache key. However, from my testing it seemed that if you provide more than 1 source that API Gateway then ANDs each parameter, which has the effect of requiring that the client supply all the headers. This wouldn’t work for my use case.
I will review this decision to skip auth caching after I observe the real-world latency of my migrated endpoints.
Next Steps
Now that I have my auth logic in place, I can begin migrating the “Event Metrics” service from the legacy API. I’ll be covering this in my next post.
Other articles you might enjoy:
Free Email Course
How to transition your team to a serverless-first mindset
In this 5-day email course, you’ll learn:
- Lesson 1: Why serverless is inevitable
- Lesson 2: How to identify a candidate project for your first serverless application
- Lesson 3: How to compose the building blocks that AWS provides
- Lesson 4: Common mistakes to avoid when building your first serverless application
- Lesson 5: How to break ground on your first serverless project