How to deploy a high availability web app to AWS ECS

Running your containerised web app locally is easy. Just docker run and you’re done.
But running it in a production-style environment using AWS infrastructure is much harder. If you’re not an ops expert, the decisions can be overwhelming.
You need to consider:
- What do I need to do to ensure that the servers are securely locked down?
- How do I make my app always available in the event of a container or entire server instance going down?
- How will developers on my team be able to deploy new versions of the app without breaking everything or causing downtime? Will I need to get them all set up with SSH keys?
- How will my team access the logs to debug app issues?
- What AWS services should I be using to help me with all the above?
To answer these questions, you’re worried you’ll need to spend a week or more buried in the depths of the vast AWS documentation vortex researching how to use their different services, with lots of trial and error before finally arriving at a working environment which your test users can access.
And after completing this, you realise you now need to spend another day documenting all the steps you took so that your colleagues can rebuild the environment in the future (because most AWS documentation tells you where to point and click in the AWS Console – pretty useless for creating a repeatable or automatable build process).
This is a significant upfront time investment – probably time you don’t have if you’re under pressure to get the app in front of users.
So you make compromises.
You stick to what you know and just manually create a couple of EC2 instances using the AWS Console. You SSH and SCP over your built Docker image and invoke docker run on each one. Most steps don’t get documented, and live on only in your head. Your team can always work backwards from the configuration in the Console if they need to rebuild the environment. And they can always SSH in to the instances to do deployments and check logs. Not ideal, but it will do for now.
But you don’t need to take on all this advance technical debt.
You can instead get a production-ready app up and working in less than an hour using the AWS Elastic Container Service (ECS). By the end of this guide, you will have:
- Highly available, load-balanced requests to your container instances (via Application Load Balancer)
- A durable and secure set of server instances (via an Auto Scaling Group) running an OS optimised for hosting containers
- Centralised, searchable app logs (via CloudWatch)
- Versioned Docker images of your app hosted in AWS Elastic Container Repository (ECR)
- A fast, reliable and SSH-free application release process
- Repeatable and version controlled environment configuration process (via a CloudFormation stack template)
This process and architecture is based on the tried and tested approach I have been using to host the API and management portal for my SaaS business on AWS for the past 3 years.
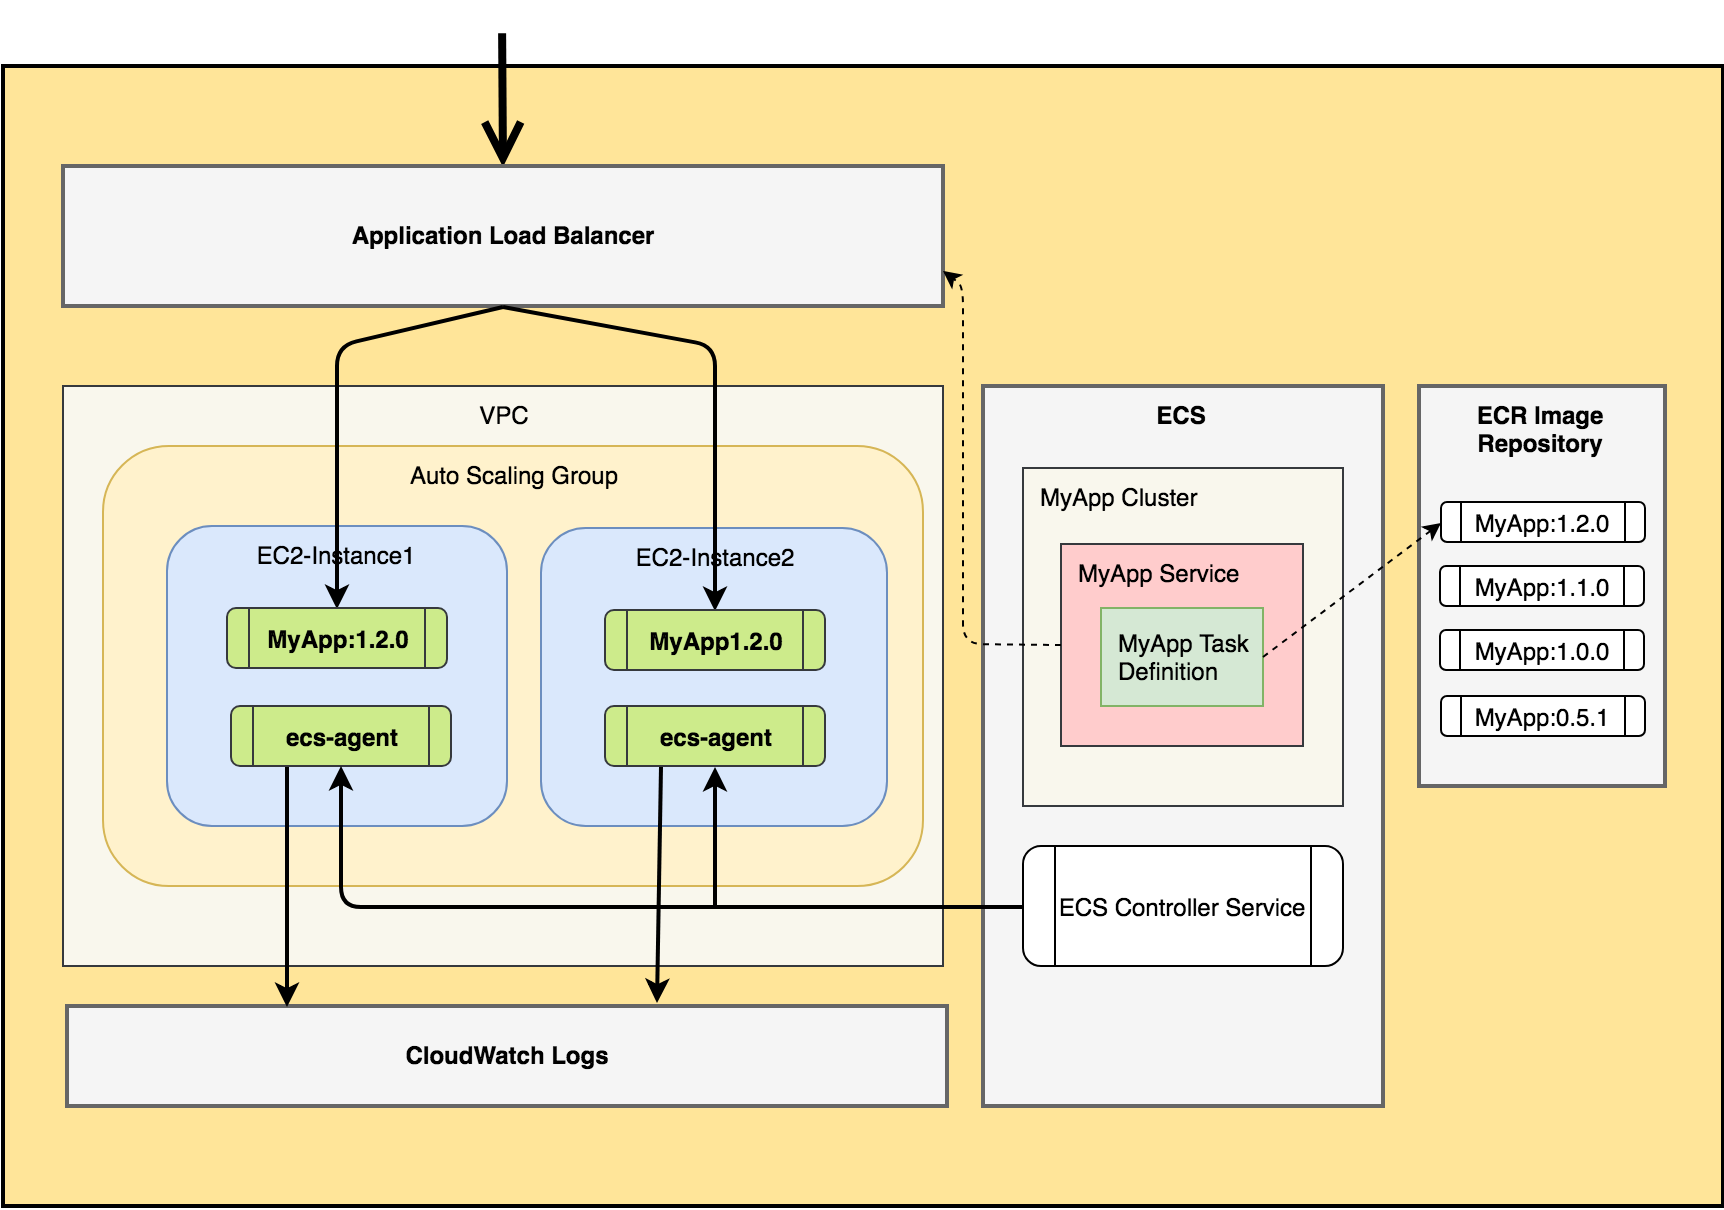
Firstly, ECS is the service which AWS provides to orchestrate containers running on top of EC2 instances. It works by having an agent process run on each host instance which the central ECS controller service communicates with, instructing the agent to spawn or kill specific containers as well as performing health checks on running containers.
ECS provides the following resources which we will be using:
- A Cluster is a logical grouping of EC2 instances that are made available for application containers to be run upon. ECS will run its agent process on each instance in the cluster.
- A Task Definition is where you configure how a container will run. In particular, you will specify the Docker image which will be used, port mappings, its memory/CPU requirements and any environment variables which should be set in the container at runtime.
- A Task is what ECS calls a running Docker container that was created using the configuration provided in a Task Definition.
- A Service is where you define the orchestration requirements for a particular task definition. The main item here is defining the desired number of tasks for a task definition which should be running at any time. It is possible to configure different task definitions within a single service, but for our web app we will just have a 1:1 mapping from service to task definition. Within the service, you will also tell ECS what load balancer to use for routing requests to it.
Check out this article for a more in-depth look at ECS definitions.
Building your Environment
Ok, time to start creating resources…
Step 0: Pre-requisites
The rest of the guide assumes that:
- you already have an AWS account
- it has a VPC and at least 2 public subnets configured (preferably in different availability zones)
- you have created an EC2 Key-Pair which would be used to SSH into EC2 instances from your computer
- you have the AWS CLI installed on your computer
Step 1: Prep your app source code
If you would prefer to use a ready-made basic Node.js web app to work through the remaining steps, you can pull this repo to your machine and go to Step 2.
If you have already Dockerised your app and are now ready to deploy it, then just copy this shell file into the root folder of your application source code. It contains a few helper scripts we will be using to build and deploy the Docker image.
Step 2: Configure Docker Variables
Open the docker-task.sh file and update the following variables:
IMAGE_NAME: this must be set to the name of the image you wish to create (e.g.winterwindsoftware/simple-express-app)AWS_REGION: name of the region where you’re deploying to (e.g.us-east-1)CONTAINER_PORT: port number that is exposed from your container image (if using sample app, this will be 8080)
Save the file.
Step 3: Create ECR Repository
./docker-task.sh createrepoThis will create a new repository named the same as the IMAGE_NAME variable.
Note down the value of the repositoryUri JSON field printed in the response from AWS in your terminal. Open the docker-task.sh file and update the REPOSITORY_PATH with the first part of this value (right up to the “amazonaws.com” bit). It should look something like <aws_account_id>.dkr.ecr.<aws_region>.amazonaws.com.
You can then open the ECR Console to verify that the repo was created ok.
Step 4: Build Docker image locally
./docker-task.sh buildStep 5: Deploy image to ECR
To upload the image to ECR, run:
./docker-task.sh pushIf you refresh the AWS console once this completes, you should see the new image listed there.
Step 6: Create CloudFormation Stack
We will use a CloudFormation stack to launch all the requisite AWS resources.
Copy over this stack file into a new /cloudformation folder in your app’s codebase.
Then open your terminal and run the CLI command below to create your stack. Before running it, you will need to update all values surrounded by angle brackets, e.g. (<vpc_id>).
aws cloudformation deploy \
    --stack-name SimpleExpressApp \
    --template-file ./cloudformation/ecs-webapp-stack.yml \
    --capabilities CAPABILITY_IAM \
    --parameter-overrides KeyName='<keypair_id>' \
    VpcId='<vpc_id>' \
    SubnetId='<subnet_id_1>,<subnet_id_2>' \
    ContainerPort=8080 \
    DesiredCapacity=2 \
    EcsImageUri='<ecr_image_uri>' \
    EcsImageVersion='<app_version>' \
    InstanceType=t2.micro \
    MaxSize=3
⚠️ Be aware that this will create some paid-for hourly resources, including 2 micro EC2 instances and an Application Load Balancer. If you’re just creating this stack as a test, you can delete your stack using the CloudFormation console once you’re finished to remove all resources.
Step 7: Test in browser
The stack will take around 5 minutes to create. Once it completes, go to the Load Balancers console and select the ALB which was created. Copy the value of the DNS name setting into your browser address bar. It should look something like ecsalb-12345678.us-east-1.elb.amazonaws.com. This should open the app home page.
You can also view the logs from your app by going to the CloudWatch Logs Console.
How do I deploy new versions of my app?
Push new image version
To deploy an updated version of the app, first make a small change to your codebase.
If you’re using the sample Node.js app, you can simply run npm version minor to bump the minor version number as it’s dynamically read and rendered on the home page.
Then run the following to build and push the new version of the image to ECR:
./docker-task.sh build && ./docker-task.sh pushUpdate running containers to use new version of the image
Note down the new version number. Then run the same CLI command as in Step 6, except with the EciImageVersion parameter value updated (this example has a new version number of 1.1.0):
aws cloudformation deploy \
    --stack-name SimpleExpressApp \
    --template-file ./cloudformation/ecs-webapp-stack.yml \
    --capabilities CAPABILITY_IAM \
    --parameter-overrides KeyName='<keypair_id>' \
    VpcId='<vpc_id>' \
    SubnetId='<subnet_id_1>,<subnet_id_2>' \
    ContainerPort=8080 \
    DesiredCapacity=2 \
    EcsImageUri='<ecr_image_uri>' \
    EcsImageVersion='1.1.0' \
    InstanceType=t2.micro \
    MaxSize=3
Once the stack update completes, refresh your browser to see the new version of the app. That’s it! No SSH-ing into servers or copying files across the network.
Rolling back
You’ve done your post-release smoke test and spot a newly introduced high priority bug. 😰 It will take a while to investigate/fix so you decide to rollback to the previous version in the meantime. No problem! Simply re-run the CloudFormation deploy command specifying the previous version number. Sweat over 😅.
Extending your stack
So you now have a running, high availability containerised web app.
If you want to take this further and extend the stack for your own requirements, you can do so by editing the ecs-webapp-stack.yml CloudFormation template.
Here are a few suggestions for things to try out:
- Add an SSL certificate to your Application Load Balancer to secure requests to your web app
- Add a Route53 DNS entry to give your app a friendly domain name
- Create a separate staging environment using this same stack (hint: just rename the stack in your Cloudformation CLI deploy command)
Other articles you might enjoy:
Free Email Course
How to transition your team to a serverless-first mindset
In this 5-day email course, you’ll learn:
- Lesson 1: Why serverless is inevitable
- Lesson 2: How to identify a candidate project for your first serverless application
- Lesson 3: How to compose the building blocks that AWS provides
- Lesson 4: Common mistakes to avoid when building your first serverless application
- Lesson 5: How to break ground on your first serverless project