Schedule emails without polling a database using Step Functions
Sending emails is a pretty standard feature of a web app. Email service providers offer simple APIs allowing you to send an email with just a few lines of code.
But scheduling them to be delivered at some time in the future is a lot more hassle. Say you want an onboarding sequence for new users over the course of a few days, or perhaps you need to send a reminder about a task or event that a user has created in your app. Now you have to:
- create a
ScheduledEmailstable in your database to store future-dated messages - create a cron job to poll this table for due emails and then clear them out once they’re delivered
- maintain the server that the cron job and is running on
That’s a lot of yak shaving for something which should be much simpler.
But there is a nicer way…
By using AWS Lambda and Step Functions you get a solution that:
- Doesn’t need a database
- Involves no polling
- You only pay for how much it’s used
- Provides your app with a simple API call to invoke a Lambda (which can be treated as a microservice of its own)
If you want to jump to the full codebase, go here. If you just want the key points, stick with me and I’ll walk you through how to implement this using Node.js and the Serverless Framework.
Sidebar: while I use emails here, this approach could be applied to any future scheduled task that your app needs to perform.
Getting set up
First off, install the Serverless Framework.
We will also be using the serverless-step-functions plugin to allow us to easily configure our Step Function within the serverless.yml file.
Configuring the Step Functions sequence

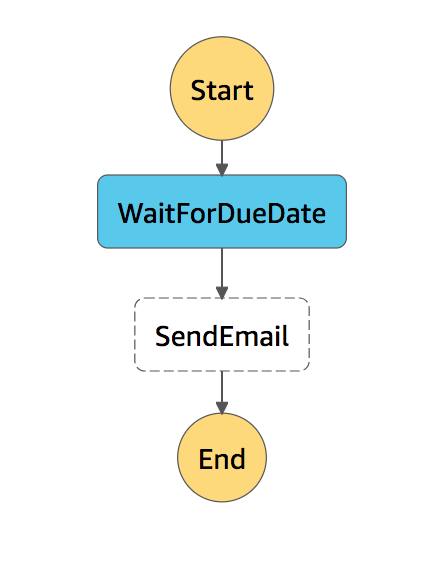
There are 2 states in the sequence:
WaitForDueDate: this is simply a Wait step which reads adueDatefield from the input object and waits until that time is reached before proceeding to the next state.SendEmail: a Lambda function which makes the API call to send the email.
These are configured as follows:
# serverless.yml
# ...
stepFunctions:
  stateMachines:
    EmailSchedulingStateMachine:
      name: EmailSchedulingStateMachine
      definition:
        Comment: "Schedules an email to be sent at a future date"
        StartAt: WaitForDueDate
        States:
          WaitForDueDate:
            Type: Wait
            TimestampPath: "$.dueDate"
            Next: SendEmail
          SendEmail:
            Type: Task
            Resource: "arn:aws:lambda:#{AWS::Region}:#{AWS::AccountId}:function:${self:service}-${opt:stage}-SendEmail"
            End: true
Create the SendEmail function
The following code defines a handler for the Lambda function SendEmail which is referenced by the SendEmail State in the Step Functions config. The function uses AWS SES to send an email.
const AWS = require('aws-sdk');
const ses = new AWS.SES();
const { EMAIL_SENDER_ADDRESS } = process.env;

module.exports.handle = async (event) => {
    const result = await sendEmail(event.email);
    console.log('Sent email successfully', result);
    return result;
};

function sendEmail(email) {
    const params = {
        Destination: {
            ToAddresses: email.to,
        },
        Message: {
            Subject: {
                Data: email.subject,
            },
            Body: {
                Html: {
                    Data: email.htmlBody || email.textBody,
                },
                Text: {
                    Data: email.textBody || email.htmlBody,
                },
            },
        },
        Source: EMAIL_SENDER_ADDRESS,
    };
    return ses.sendEmail(params).promise();
}
Initiating the scheduling
So now the SendEmail logic is implemented and hooked up to the Step Functions state machine, we need a way of starting the step function from your app. This is done by using the startExecution function in the Step Functions API.
// schedule-email.js
const AWS = require('aws-sdk');
const stepfunctions = new AWS.StepFunctions();

module.exports.scheduleEmail = async (dueDate, email) => {
    const stateMachineArn = process.env.STATEMACHINE_ARN;
    const result = await stepfunctions.startExecution({
        stateMachineArn,
        input: JSON.stringify({
            dueDate, email
        }),
    }).promise();
    console.log(`State machine ${stateMachineArn} executed successfully`, result);
    return result;
}

// ----------------------------------------------
// your-app-module.js
const scheduleEmail = require('./schedule-email');
const email = {
    to: ['test@example.com'],
    subject: 'MyApp Onboarding Day 1 - Setting up your project',
    textBody: 'TEXT body.\nsecond line.',
    htmlBody: '<strong>HTML</strong> body<br>second line.'
};
const dueDate = '2018-11-16T13:55:25.000Z';
const result = await scheduleEmail(dueDate, email);

// result :
// {
//     "executionArn": "arn:aws:states:eu-west-1:123456789:execution:EmailSchedulingStateMachine:84b1f498-ab4d-4f69-a635-ab1fa5199e16",
//     "startDate": "2018-11-16T16:19:23.560Z"
// }
You will need to update the IAM role which your app is running under to allow the states:StartExecution action on the EmailSchedulingStateMachine state machine.
What if I need to cancel a scheduled email?
The startExecution call returns an object which contains a unique executionArn string for this execution. If you need the ability to cancel emails, you can store this ARN and then later pass it to the stopExecution function to cancel the execution before it proceeds to the SendEmail state (assuming it hasn’t already ended).
Try it out for yourself
If you think this would be useful to you then clone this repo and deploy it yourself.
Some potential enhancements which you could make:
- Add retry logic if sending email fails (supported by the
serverless-step-functionsplugin) - Support email providers other than SES
Other articles you might enjoy:
Free Email Course
How to transition your team to a serverless-first mindset
In this 5-day email course, you’ll learn:
- Lesson 1: Why serverless is inevitable
- Lesson 2: How to identify a candidate project for your first serverless application
- Lesson 3: How to compose the building blocks that AWS provides
- Lesson 4: Common mistakes to avoid when building your first serverless application
- Lesson 5: How to break ground on your first serverless project